Thursday, November 29, 2012

30 Days of Gratitude

It's Simple Stories week over at the Epiphany Crafts blog this week.  I was so excited to get to work with their beautiful Harvest Lane collection and ended up making a few projects with it.  Today I will be sharing my 30 Days of Gratitude project.

 
I came across a few people on Facebook doing a 30 days of gratitude list and loved the idea.  I decided to use one of the Harvest Lane Pockets and create 30 tags to put inside to record my 30 days of gratitude.

 
I used the Epiphany Crafts Shape Studio Oval 25 tool to cut out the heart and added it to the Epiphany Crafts Metal Charm for a beautiful embellishment.

 
For the tags I used the 6 x 6 paper pad, the little sized journaling cards were perfect to use on tags.  I love this project and plan on getting my husband and kids involved and writing down what they are grateful for as well.
 
Thanks for stopping by.
 

Wednesday, November 28, 2012

Christmas Packaging

I was getting together with the Clipper Chicks (my old coworkers) for a fun evening and I wanted to give them all a little something for the holidays.  I used some white paper bags and decorated them with some old Echo Park Christmas paper I had left over from last year.

 
I love making pretty packaging for my gifts, it makes it feel even more special when I give them away.


Thanks for stopping by.


Monday, November 26, 2012

Simple Stories Accordion Album

It's Simple Stories week over at the Epiphany Crafts Blog this week and we got to play with the Simple Stories Harvest Lane Collection.  I wanted to create a mini album that can also be displayed and these accordion albums are perfect for that.


To create it I used two pieces of patterned paper measuring 4" x 12" and scored them at 4" and glued the two pieces together to make the base of the album.

Then I cut out the 4" x 6" journaling cards from the patterned paper and adhered them onto each of the sides of the album.
 
I decorated the cover with the Epiphany Crafts Shape Studio Tool Square and the Square Metal Charms.  I found a sticker on the sheet that was the perfect size to fit into the square charm and attached it with some twine.

 
I used the stickers from the coordinating sticker sheet to decorate the pages.  I really love how this type of album can be placed on a shelf or mantle and displayed.

Thanks for stopping by.


Friday, November 23, 2012

The Smiths

Yes we are one of the many Smith's in this world.  I love my little family, so thankful for all of them. 


My husband Mike and I have been together for over 26 years and I am very lucky to still have an amazing and strong relationship with him. 

 
My oldest son Rhys is very techy and loves anything to do with computers, at 13 he is all ready creating computer programs and trying to figure out how to hack computers.

 
  My youngest son Linden is the exact opposite and loves to dance and sing and is very outgoing and crazy.


 I am blessed.


Thanks for stopping by

Tuesday, November 20, 2012

Fall Frames

I am up on the Epiphany Crafts Blog with a trio of fall frames I made using the Epiphany Crafts Shape Studio Tool Round 25 and the Simple Stories Harvest Lane Collection. 


I had so much fun turning plain, cheap wood frames into some fall home decor pieces.  For more details and instructions on how I made these frames head on over to the Epiphany Crafts blog.

Thanks for stopping by.

Sunday, November 18, 2012

Writing Santa

I am really bad about scrapping my Christmas photos, I am not really sure why but they rarely seem to make it on a layout.  I had some really cute photos of my son writing a note to Santa that I really wanted to scrapbook so when Two Peas had an early Christmas challenge I decided I would scrap them.


 The patterned paper is from last years Crate Paper Christmas collection, I didn't have a lot left so I used up the scraps for this layout. 

 
I made the snowflakes using a scallop punch and cutting a few of the scallops off. I created a video on how I made them which I will add at the end of the post in case you are interested in seeing how they are made.
 
 
I am so glad I managed to get at least one Christmas photo scrapped, I really will try and do more this year.
 
Here's the video.
 
Thanks for stopping by.

Friday, November 16, 2012

Washi Cards

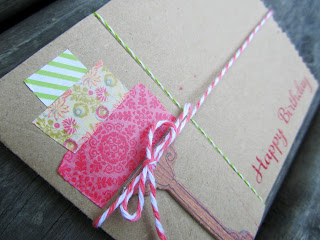
Washi Tape is so big in paper crafting right now, it seems like everyone is a little addicted...including me.  I had to make a few quick cards this week and decided to pull out my washi tape and see what I could come up with.

The first card I had to make was a birthday card for my Mom.  I used a Crate Paper chipboard pedestal as the base for my washi tape cake on top.


I added two different colored twine to make the card look like a wrapped present and stamped the sentiment directly on the card.

 
The second card was for our friends anniversary and I wanted something simple. 
 
 
I made a banner from washi tape hung on twine and stamped my sentiment on the same color card stock as the card then cut it into a banner shape and used foam tape to pop it up.
 
 
These washi cards were so fun to make.
 
Thanks for stopping by.
 

Thursday, November 15, 2012

A Masculine Christmas Card

I wanted to make a masculine card with a gift holder for my sons coach.  I used the American Crafts Kringle and Co. collection and added a small Kraft bag for the actual gift card holder.


I love the dark greens in this collection and the deer die cut is beautiful.  I cut down the Kraft paper bag to fit the card and used a border punch to scallop the top of it.  I added a little twine to the bottom and a small sentiment sticker.


I love how this turned out using the bag for the gift card holder, will definitely do this again.  Thanks for stopping by.

Wednesday, November 14, 2012

Littlest Pet Shop Tin

My son has a lot of friends that are girls and they are always playing with the Littlest Pet Shop animals.  They are so cute.  I turned an old Altoids mint tin into a fun getaway for one of his friends as a present.

 
I used Bella Blvd. patterned paper that had a tropical theme to create this getaway.
 
 
First I covered the inside as well as the outside of the Altoids tin with patterned paper.

 
I cut out the palm tree and some clouds to create a little scene in the top lid.

 
For the bottom lid I mad a little bucket and spade for her to play with.
 
I had so much fun making this little present.  When my son saw it he asked me to make another one for another friend.  I think I see a lot of these in my future lol.
 
Thanks for stopping by.

Monday, November 12, 2012

You Are My Sunshine

This kid is my sunshine, he is always making me laugh and entertaining me.  I wanted to make a fun, colorful layout for this picture of him and I. 

 
I used the American Crafts Shoreline collection which has such fun, bright colors and patterns.


I made some big sun rays with the patterned paper and added a fun glitter button to the centre.  Even though they are really big I love how they looked on the layout.

 
I used the Silhouette to cut out my title and used both the cut out and the negative for my title.  This layout is now one of my favorites it's so bright and colorful just like my son.
 
Thanks for stopping by.

Sunday, November 11, 2012

Hanauma Bay

One of our favorite places to visit when we go to Hawaii is Hanauma Bay.  It is so fun for the kids to snorkel and see the amazing sea life, one of them even saw a turtle.

\
 
I loved this paper by Echo Park but sometimes I have difficulty scrapping with big scenes like this one.  I decided to keep the layout simple and add only a few embellishments and the title.


I cut out the flowers from a coordinating paper and added buttons to the centre.  I also added a button to the centre of the sun to make it stand out more.

 
Sometimes when you get stuck using a paper or photos the best thing is to keep it simple and move on.
 
Thanks for stopping by.

Friday, November 9, 2012

First Christmas Card

I make a lot of Christmas cards for friends and family so I have to get an early start, this is the first one of the season...only 99 more left to go (just kidding).


I used the This and That Christmas collection from Echo Park, I knew as soon as I saw it it would be a collection I would have to get.  I loved the colors, the patterns and the wood grain.


I have been working on my layering as it's something I struggle with but I love how this card turned out.  I used up most of the scraps and made a woven background and used foam tape to add dimension.


A little twine and a sticker sentiment to finish it off.  Now I am off to make some more.  Thanks for stopping by.
 

Wednesday, November 7, 2012

Spring and fluttering butterflies

Today is my day over at the Epiphany Crafts Blog.  This week we were very excited to play with the My Little Shoebox paper collections.  I was given the Secret Garden and Cherry Delight collections which are very pretty.  I really loved the spring feel to the Cherry Delight collection and made a Spring Mini Album.  I wanted to make something a bit different and ended up using a Kraft paper bag as the cover of my mini.  Here's a few sneak peeks of my project.


You can see all the inside pages and more details on the Epiphany Crafts blog, hope you can stop by and leave me a comment.

Thanks for stopping by.


Monday, November 5, 2012

It's My Little Shoebox week over at the Epiphany Crafts Blog

This week the Epiphany Crafts design team was so excited to play with some My Little Shoe Box collections.  They are so pretty and cute, love the colors and designs.  My main project will be up on the Epiphany Crafts blog Wednesday but you can pop over and see what the rest of the design team created this week.

After doing my main project I had some paper left over so I created a few cards.  I got to play with the Secret Garden and Cherry Delight collections.  I love the die cut flowers that come with each collection that you can roll up.  I decided instead of rolling them up that I would keep them flat and layer them to make this card.


I stitched around the edge of the card and added a crocheted flower and Studio Calico wooden heart to the centre.
 
 
 I tied some crochet thread around the card to finish it off.

 
For the second card I rolled up the flowers from the die cute sheet and made a quick Hi card.

 
I used the die cut banners on each end of the journaling card to make it look like a big banner.  I also cut out additional butterflies and added them on top of the butterflies all ready on the card to add some dimension to them.


These rolled flowers are so pretty.  I love that they have different shapes to them as well. 

 
I had so much fun playing with these soft and pretty collections from My Little Shoebox this week. Thanks for stopping by.

Saturday, November 3, 2012

Thanksgiving Table Setting

Today I am up over at the Epiphany Crafts blog with my Thanksgiving Table Setting.  I had so much fun using the Epiphany Crafts Shape Studio Tool Oval 25 and the Metal Charms Oval 25.  I created a card, napkin ring and place setting using the Lily Bee Autumn Spice collection.


For more details and to watch a video I created showing how I made these projects head on over to the Epiphany Crafts Blog .

Here is the video for how I created this table setting:


Thanks for stopping by.